Photography Safaris
Africa provides fantastic photographic opportunities. Any safari to Africa will offer thrilling opportunities for good photographs. However, opting for a tailor-made photographic safari will guarantee perfectly preserved memories, captured on film.
A classic safari includes great accommodation, amazing scenery, and exceptionally good guides, but sometimes it doesn’t involve superb photography. That’s why a specialist photographic safari is highly recommended for travellers who are particularly interested in wildlife photography and landscape photography. Heading into the bush with a knowledgeable photography guide can make all the difference when your subject is Africa’s unpredictable wildlife. Whether you’re trying to get a stable image of the thundering wildebeest migration or the perfect portrait of a shy cat, your private professional photography guide is on hand to share their tricks of the trade.
Photographing wildlife has always allowed me to share the stories from these great adventures with friends and family far and wide when I’m home. It adds another dimension to the whole experience and allows those who can’t travel to share in some of the joy!

1. What photography equipment to take on a safari to Africa
I won’t spend too much time discussing photographic equipment, as we have a specific blog about it by Will Burrard-Lucas. However, I’ll mention that there’s a huge range of equipment available on the market. You can go for anything from an inexpensive but good ‘point-and-shoot’ camera to some seriously expensive professional kit. The point is, there’s a camera for everyone, so we’re all able to capture the special moments we get to witness on what is often the experience of a lifetime!
Bridge or compact camera
The ‘bridge’ or ‘compact’ camera is a great start for anyone who doesn’t have a specific passion about photography yet would like to take some high-quality photos and easily capture the memories being made on safari. These cameras are digital, one-piece devices that have a fantastic zoom range (allowing you to zoom right in to subjects far away but also to take some wide-angle landscape shots). They’re also getting better and better sensors (which detect the actual picture you are going to take), making for outstanding image quality. So, two of the main things are available in a clever, easy-to-use camera that’s light and also easy to transport (very handy for luggage-limited safaris). Good examples of this kind of camera are the Sony HX350 and the Canon SX540.
DSLR camera systems
Moving up from here, and we get into the DSLR camera systems. Currently there’s a big debate going on about which is better – the traditional mirrored cameras or the new technology mirrorless cameras. Basically, the invention and development of mirrorless cameras means they have become lighter overall and faster to capture pictures. Sounds great! The drawback is that the image quality is not quite up to the standard of the older, mirrored cameras. So there are certainly pros and cons to weigh up here. But whichever system and brand you settle on (there are a lot, and they’re all good in their own way), you will need a lens that fits it with a range of around 400mm to cover most of the wildlife you’ll see, as sometimes things are a little farther away than you might hope. However, combining this with a wider angle lens of between 20 and 50mm again allows you to take some ‘in-situ’ habitat, landscape, and also people and lodge photos to make sure you capture all the different aspects of your safari experience. Personally, I am a fan of the ‘zoom lens’ (a lens enabling you to change the zoom length) over the ‘prime lens’ (a lens with a fixed focal length).
2. Advice on getting the best camera setup for a wildlife photograph
Once you have the equipment you want, the next thing is setting it up. Here, I’ll start by saying that automatic settings on bridge/compact cameras have got better and better, and will certainly result in good–great photos in most normal situations. So, for ease of use with a compact camera and with the goal of capturing what you see on your safari, automatic settings are fine. However, once you start getting more into the specifics of photography and especially if you’ve made the investment in a SLR system (be it mirrored or mirror-less), you will want more control over the specific settings.
Aperture
There are many different variables and options when it comes to controlling the settings, but I’ve found that the best programme to be on is aperture priority (this will be displayed as ‘Av’ or ‘A’). This programme allows you to control how much light is entering the camera, which directly dictates how quickly you can ‘freeze’ a moment in your camera’s sensor. The less light let in, the longer the shutter needs to stay open (i.e., be exposed). This means a higher likelihood of a blurry image, as either the subject might move or the camera might shake. So, the more light let in the better with regard to wildlife photography, where you are, generally, trying to get clear sharp images of the animals you are seeing.
Creating depth of field
The variable in aperture priority is called the F number. The lower the F number, the more light is let into the camera. The trade-off of a lower F number is a shallower (thinner) depth of field for your focus. This can be a good thing for wildlife, as the small section of the scene that is in focus will be nice and sharp. But if you’re wanting to get the background into focus too, you might have some decisions to make. Any F number between 2 and 5 is going to give you a fast and sharp image, as lots of light is let in. Any F number from 10 and above is going to start giving you a much wider depth of field, so lots of the scene you are seeing will be in focus. But the shutter speed will slow down and you’ll risk having a blurry picture.
ISO number
A way of counter-acting this slow down and a way of producing faster pictures in low light is to increase the camera’s sensitivity to light. You can do this by adjusting the ISO number. New cameras have high ISO numbers and so can become very sensitive to light (meaning they do not need much light to be able to expose a good photo). As with everything, there is a trade-off. The higher the ISO number, the more chance there is of having a slightly grainy photo. So it is best to use the lowest ISO number you can.
The goal of varying the aperture value and the ISO value is to give you the fastest shutter speed (smallest time the shutter is open) but with enough light, so that a sharp and well-lit image is produced. Any change to one of these variables directly impacts on the others.
3. Top tips on making use of the light
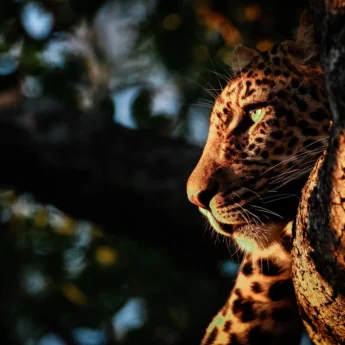
The most important light to be thinking about is how your subject (what you are wanting to photograph) is set up. The ideal situation is to have your light source (almost always the sun) directly behind you, so that you are between the sun and your subject. This will mean that the subject is being nicely ‘lit up’ by the sun and not in shadow. On safari, a lot of guides have at least a basic knowledge of photography and will position you correctly, but please do bear in mind that rules regarding off-roading or the number of vehicles parked by certain animals may well limit your flexibility at sightings.
However, some of the best, unique, photographic opportunities occur when the subject is lit up at a different angle. For example, the sun might be at right angles to you and your subject. This would make half of your subject lit up and half of it in shadow.
Back lit
Another interesting situation occurs when the sun is behind your subject, making the subject ‘back lit’. This type of lighting will often result in silhouette photos in which the subject appears dark in front of a light background. This can work really well for hairy mammals (no jokes, please), as the light catches on the hair and can create almost a ‘halo’ effect. But here’s a word of warning when attempting these photos: make sure you don’t have the sun shining straight into the lens, otherwise you will get sun spots on your photo. A lens hood can help to reduce this effect.
4. How to choose the best subjects
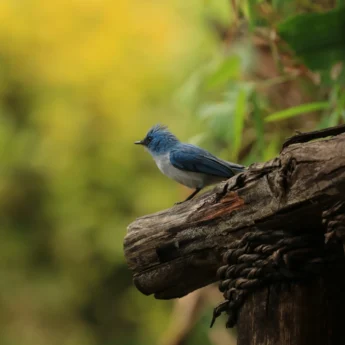
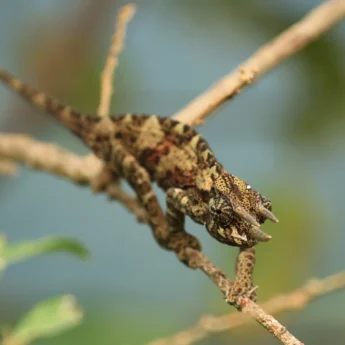
Sometimes the best subjects are not the obvious ones. And more often than not, it’s the background, or lack of background, that really completes a good photo. Images of whichever specific animal you are lucky enough to be witnessing at the time are great. However, capturing that animal doing something (yawning, playing, eating, etc.) really adds some depth and uniqueness to the shot.
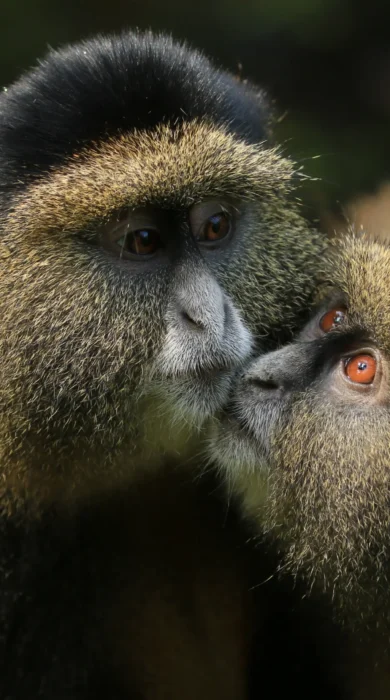
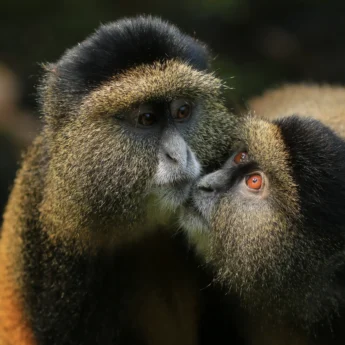
We, as humans, are drawn to eye contact. So, when you’re taking fairly close-up photos of animals, make sure to keep the eye/s in focus and as a fairly main part of the photo. If there’s some dappled light on your subject, you can wait until it just catches the subject’s eye/s. This usually results in quite an ‘eye-catching’ photo.
Getting a wildlife photo that depicts the animal in its natural habitat is another exciting thing to be on the look-out for – especially in Africa, where we get some absolutely amazing and dramatic skies. Having an animal as a focus yet surrounded by a dramatic and colourful sky can really set the scene for the sheer grandness of a safari in Africa. Photos like these will help you remember the scale of what you have witnessed, and not just the specific animals or specific situations.
Sunset and sunrise really are the best times to get the fullest colours in a photo. It’s worth playing around with the white balance setting in your camera now, although it’s better to slightly underexpose so you don’t lose any detail in your subject.
You should get a lovely ‘warm’ feeling to your photos during these times. So be careful not to go too far into the orange side of things if you like to adjust the lighting of your photos afterwards on a computer. Silhouette photos at sunset can work really well!
Harsh light is also worth a mention. Sometimes, and especially in the middle of the day (or with a spotlight, if you’re lucky enough to be out on a night drive!), the light beaming onto your subject can be very harsh. This results in many colours and details becoming lost, as the camera cannot compensate enough. A really good option now is to consider taking your photo in black and white, as the camera only has to work with these two absolutes. You can get some very good pictures like this, at a time when most other people have put their cameras away. Another thing to consider during these times is that many animals move into the shade during these hotter parts of the day.
A good tip for taking a photo of something sitting in the shade of a bush but with bright light all around is to use your flash. I know this sounds counter-intuitive, but the flash will make for less contrast between your subject and the background, and therefore your photo will be better exposed than if you had a bright background and a dark subject.
When it comes to a lack of light, photographing in forests can be particularly difficult. And this does relate specifically to trekking gorillas, for example. From my recent experience, trekking in Bwindi Impenetrable Forest, I found that trying to use the dappled lighting (as I’ve mentioned before) is best if you are lucky enough to be trekking on a sunny day. But if it’s raining (as it usually is, in rainforests), the generally cloudy light can actually help and make the forest a more uniform light reflector (instead of having really bright and really dark areas). If it’s a sunny day, you’ll need to switch between different metering modes (have a look through your camera’s instruction book), using spot metering for just the subject being well lit and evaluative metering to give a better in-situ (forest-and-all) composition.
Make sure you are geared up for keeping your equipment safe and dry! And most importantly about taking photos on safari… don’t forget to enjoy the experiences you are witnessing! If you are a keen photographer, we can arrange specialist photography holidays tailored you to with knowledgeable experts on hand to assist in getting the exposure just right.
Speak to an Expert
Let one of our Yellow Zebra specialists design
your tailor‑made African adventure